Users may sometimes have to disassemble and reassemble their RoboVac when replacing certain parts on the RoboVac in order to resolve an issue, such as the side brush motor, rolling brush motor, front bumper, etc.
Note: This article is applicable for the Bounce series and the G series RoboVac models that started having issues of returning to the charging base after a part replacement. If you did not disassemble the RoboVac and it still failed to return to the charging base, please visit the following articles instead:
- What to do if my Bounce series RoboVac does not return to the charging base?
- What to do if my G series RoboVac does not return to the charging base?
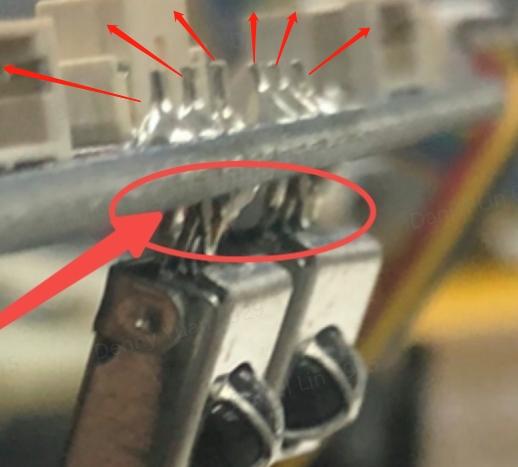
After the RoboVac has been disassembled and reassembled, it might experience an issue where it is no longer able to successfully return to the charging base automatically. This is usually due to the infrared sensor connector pins (shown in the image below) being either damaged or bent, which results in the RoboVac being unable to successfully establish a signal connection with the charging base.
If you have encountered this specific issue, please try the following troubleshooting steps to verify if the issue can be resolved:
Step 1)
Disassemble the RoboVac to check its infrared sensors located on the front of the RoboVac after the bumper is removed.
Step 2)
Verify both infrared sensor connector pins have not been damaged or pushed in as shown in the following images. If the infrared sensor connector pins are slightly bent, please gently pull the connector pins forward so they form a 90-degree angle with the main board.


Step 3)
Carefully reassemble the RoboVac and its bumper. Once the RoboVac has been reassembled, please place the RoboVac at approximately 6 ft away from the charging base with a direct line of sight, then use either the remote or the app (depending on the model) to guide the RoboVac back to its charging base.
Step 4)
If both infrared sensor connector pins are not damaged and the RoboVac is still unable to detect the charging base, please refer to the following troubleshooting steps to resolve the issue depending on your RoboVac model.
- Bounce series RoboVac fails to find its charging base.
- G series RoboVac fails to find its charging base.
If your RoboVac is still experiencing issues returning to the charging base automatically, please contact us for assistance.